

Your child comes home from daycare with the wrong water bottle, an unlabeled lunchbox, and one shoe that somehow belongs to another family. The items looked nearly identical in the cubby, and the tiny paper sticker you applied last week has already curled at the edge after one wash.
Waterproof sticker letters can bring order to that daily mix-up, but only when the label matches the job. A bottle needs reliable wet adhesion. A lunchbox may need to tolerate heat and dishwashing. Clothing and shoes face flexing, friction, detergent, and repeated handling. Calling all of these uses “waterproof” hides the trade-offs that decide whether a label survives daycare chaos.
Why Waterproof Sticker Letters Matter
The fastest way to lose a child's belongings is to rely on appearance alone. A plain blue bottle looks like every other plain blue bottle. A jacket without a visible name disappears into a classroom coat pile. A personalized name made from individual letters gives children, teachers, and parents a quick visual identifier before an item gets packed into the wrong bag.
That matters because labeling isn't just about preventing replacement purchases. It reduces the small daily decisions that drain a parent's attention. A readable name on a bottle tells a teacher where it belongs, helps a child recognize their own things, and gives a caregiver a simple way to sort items after outdoor play or mealtime. Practical guidance on why labeling your child's belongings matters reflects that broader organizational value.
The difference between ordinary stickers and durable labels
A standard paper sticker may work for a storage bin that stays indoors. It usually struggles on a bottle or lunch container because water softens the paper, handling abrades the printed surface, and moisture reaches the adhesive through damaged edges. Waterproof sticker letters use a water-resistant face material and a pressure-sensitive adhesive intended to remain attached under more demanding conditions.
That still doesn't make every waterproof label interchangeable. A label can keep its color while its edges lift. It can stay stuck after a splash but fail after detergent and heat. The useful question isn't “Is this waterproof?” It's “Which wet, hot, dirty, or abrasive conditions must this label handle?”
Why the category keeps growing
Waterproof labels serve packaging, logistics, healthcare, food, beverages, and consumer products, so customized alphabet labels sit within a much wider adhesive-label market. The global waterproof-label market was estimated at approximately $1.7 billion in 2024 and is projected to exceed $2.2 billion by 2034, a projection based on a 3.1% compound annual growth rate, according to market context for waterproof labels. Pressure-sensitive labels represented an estimated 45.1% of waterproof-label sales in 2024, which helps explain why adhesive-backed formats are so common.
Those figures don't represent sales of personalized letter stickers specifically. They do show why the underlying construction matters. For a parent, the practical takeaway is simple: choose a label system based on the object's routine, not on a broad waterproof claim printed on the package.
Practical rule: A label that survives a splash has passed one test. Your child's actual routine may require several more.
Understanding How Waterproof Labels Are Built
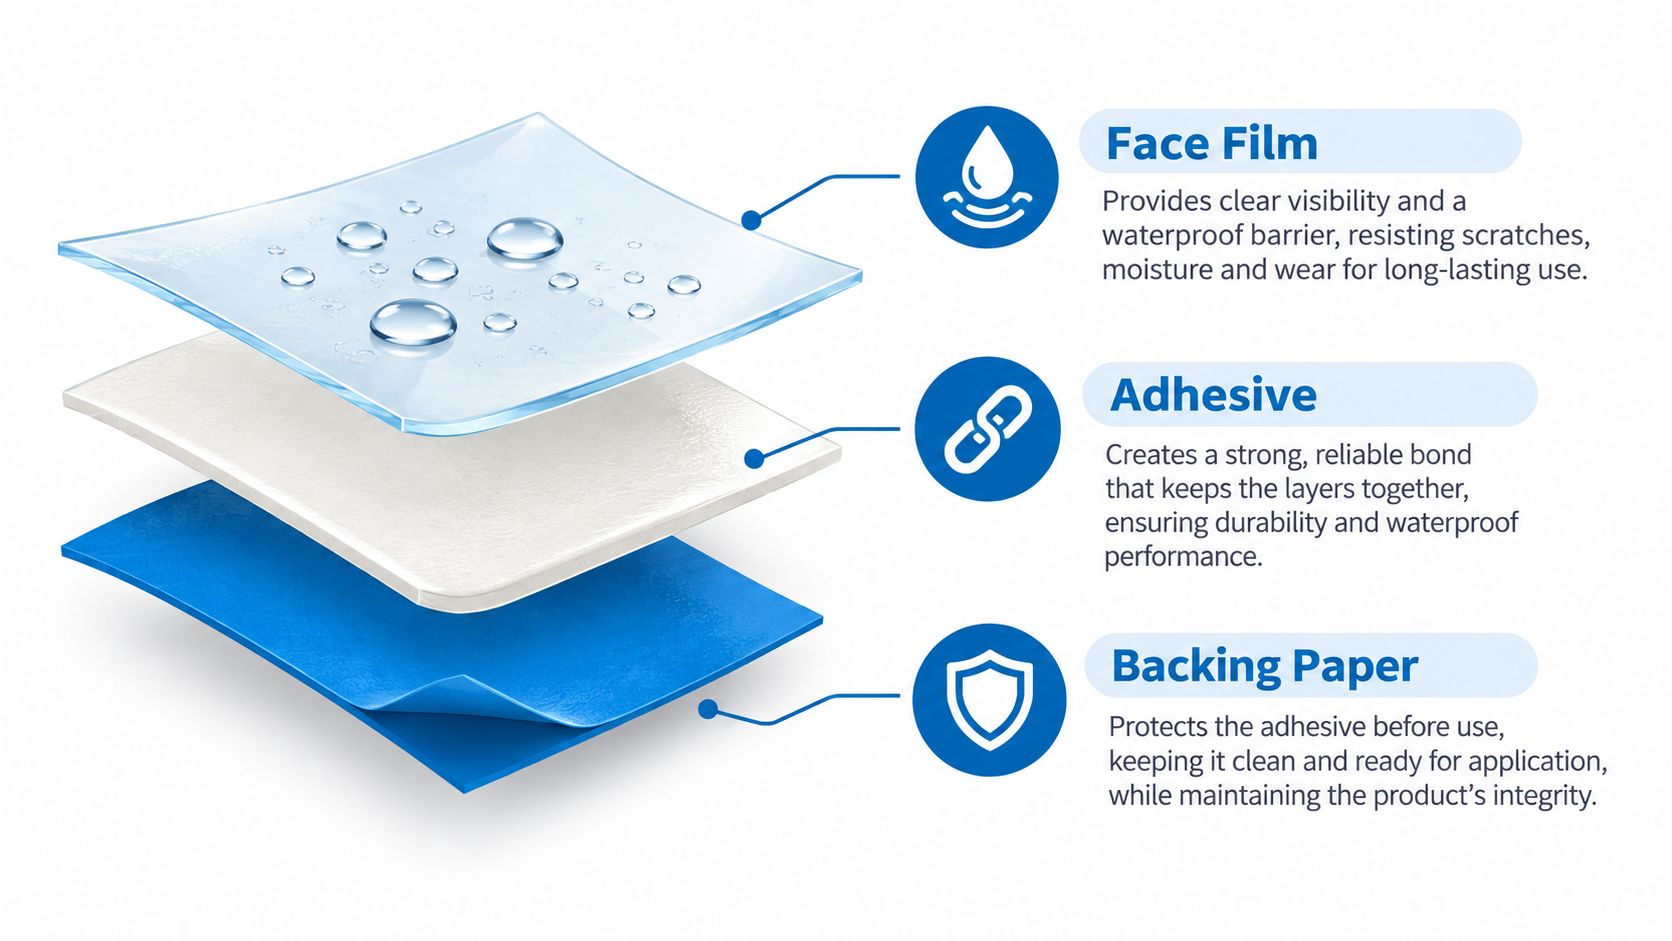
Waterproof sticker letters depend on a coordinated system of face film, printed ink, and pressure-sensitive adhesive. Each layer answers a different durability question. The face film protects the surface, the ink keeps the name readable, and the adhesive holds the letter to the item. A label can look flawless while its adhesive softens underneath, or stay attached while the printed name smears during rubbing and cleaning.
Face film protects the visible name
The face film is the layer you see and touch. Polymer films generally resist water better than paper, but flexibility and surface toughness also matter, as explained in this guide to waterproof vinyl labels. A rigid face can crack or lift across a curved bottle, while a flexible film can follow the surface more closely.
The film also receives the daily wear from fingernails, lunchbox friction, backpack straps, and repeated wiping. For bottles, containers, sports gear, and school supplies, look for a smooth, non-porous face made for hard surfaces. A label that performs well on a flat storage box may struggle on a narrow bottle because the curve places more stress on the edges.
The right face-film claim depends on the object. A bottle needs to tolerate wet handling and rubbing. A lunchbox needs a surface that can withstand repeated contact with water and cleaning. Clothing requires a construction suited to flexing and laundering, so “waterproof” alone does not describe the full job.
Ink has to stay readable
The printed name creates a separate durability risk. Water can make ink bleed, while rubbing can remove surface ink even when the film itself does not absorb moisture. Once a child's name becomes a blurred patch, the label no longer helps a teacher identify the item.
Check for stated resistance to smudging, bleeding, or fading instead of assuming that a waterproof face protects the print automatically. Outdoor use adds ultraviolet exposure, which can degrade polymers and pigments even when the label handles immersion well.
Adhesive carries the load
Pressure-sensitive adhesive forms the bond between the label and the item. It needs a clean surface, sufficient contact area, and time to build a reliable bond. Grease, dust, textured plastic, and moisture reduce the contact it can make.
ASTM D5570 evaluates water resistance by immersing tape or adhesive for at least 24 hours at approximately 23°C, then measuring the percentage that dissolves or disperses, as described in the ASTM D5570 water-resistance specification. For a household check, apply a letter to a clean, smooth surface, let it condition for 24 hours, immerse it for at least 24 hours, and inspect the edges, bubbles, residue, and color transfer.
A technical sheet for 3M 467MP transfer adhesive reports no appreciable loss of bond strength after 100 hours of room-temperature water immersion, with measured adhesion of 9.5 N/cm after that exposure. It also reports 12.3 N/cm after 2,000 hours of ASTM G154 Cycle 1 UV conditioning. These are adhesive-specific benchmarks, not guarantees for every sticker, as shown in the 3M 467MP technical data sheet.
For food or drink surfaces, waterproof performance is only one consideration. Food-contact suitability must be established separately because migration depends on chemical structure, food type, temperature, and contact duration.
Waterproof vs Dishwasher-Safe vs Fade-Proof
A bottle that gets rinsed by hand and a lunchbox that goes through a dishwasher test a label in different ways. The bottle sees cool water, soap, and wiping. The lunchbox may face heat, spray pressure, detergent, and repeated wet-dry cycles. Parents often call both labels “waterproof,” but that word alone cannot tell you whether the adhesive will survive the routine.
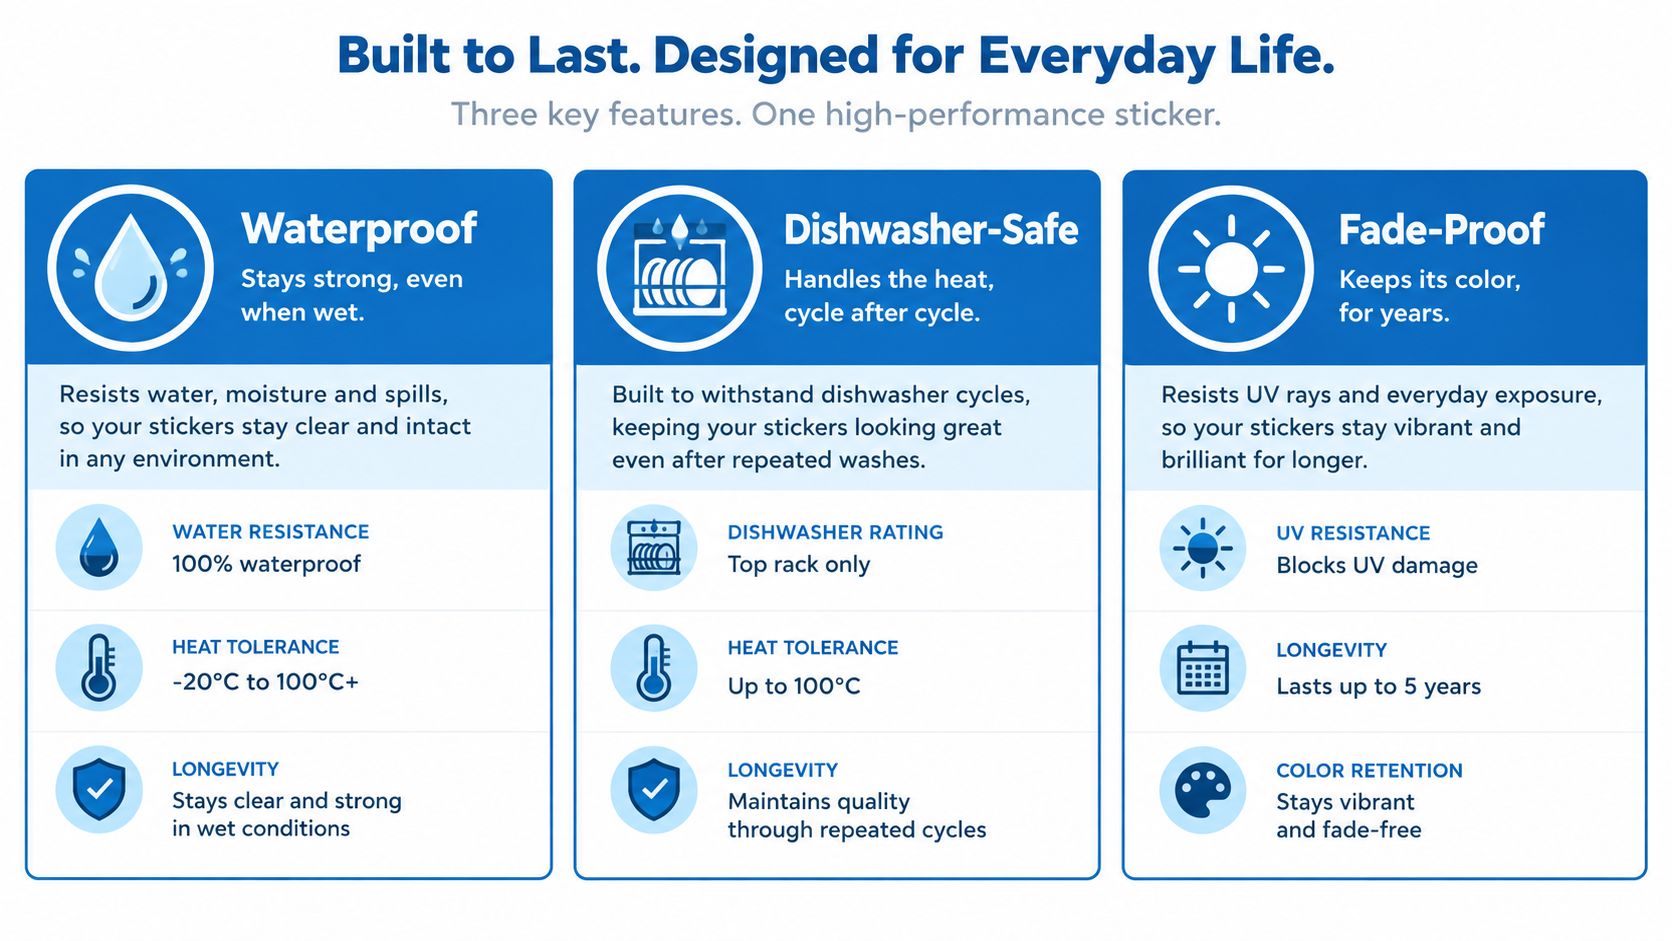
Waterproof generally means the label face resists water reaching or damaging it. It does not automatically cover heat, detergent, rubbing, or laundry. Dishwasher-safe is a use-specific claim tied to conditions such as placement and washing cycles. Fade-proof concerns the printed design or lettering, not whether the label remains attached.
Match the claim to the object
| Item | Main exposure | Claim to prioritize | What can still go wrong |
|---|---|---|---|
| Water bottle | Condensation, hand-washing, rubbing | Water resistance and wet adhesion | Edges can lift on a curved or greasy surface, or if the label is handled before the bond develops |
| Lunchbox | Water, detergent, heat, repeated washing | Dishwasher suitability for the intended placement | Heat and detergent can weaken the adhesive over time |
| Clothing | Water, detergent, flexing, tumble drying | Laundry resistance | A hard-surface sticker may peel as fabric bends |
| Shoes | Sweat, water, friction, dirt | Flexible adhesion and abrasion resistance | Toe and heel movement can wear down exposed edges |
| Backpack | Rain, sunlight, straps, handling | Water resistance and fade resistance | UV exposure can affect print and polymer materials |
The claim that matters depends on the object. A bottle label needs to stay attached through wet handling. A lunchbox label needs a dishwasher rating that matches its placement. Clothing requires flexibility, while a backpack also needs protection against sunlight. Treating all four cases as a simple waterproof-or-not decision leads to the wrong product.
Repeated dishwasher heat can weaken adhesive bonds over time, even when the sticker face stays water-resistant, according to guidance on how waterproof labels work. A label can look clean after washing while its perimeter gradually begins to curl.
Read the care instructions literally
If packaging says “waterproof” but says nothing about dishwashers, do not treat it as a dishwasher guarantee. This comparison of waterproof and dishwasher-safe labels explains how the two claims differ. If it says dishwasher-safe, check for instructions about top-rack use, smooth surfaces, or a curing period before the first wash.
Microwave use requires a separate compatibility check. Water resistance does not establish microwave safety.
For clothing, shoes, and fabric bags, choose a label made for flexible materials. A hard-surface sticker may work well on a bottle and peel quickly from a T-shirt. The most durable-looking label is not always the right choice. Match the stated or tested use to the object's actual treatment.
Common Uses for Waterproof Sticker Letters
Start with the item that causes the most confusion in your home. For many families, that's a water bottle. For others, it's a lunch container, a set of identical shoes, or a pile of classroom supplies that all look interchangeable.
Apply names where a caregiver can see them quickly. The outside of a bottle, the lid or side of a lunchbox, and the smooth upper area of a hard shoe are usually more useful than a hidden underside. Clean the surface thoroughly, let it dry, and press the label down firmly, especially around the edges.
Choose by material, not just by name
Hard containers: Bottles, lunchboxes, snack cups, pencil cases, and plastic art boxes generally need labels with a durable face and adhesive intended for smooth surfaces. A large rectangle works well when there's room for a full first name, while a smaller shape suits narrow bottles or compact lids.
Clothing: Fabric needs a different solution because it flexes, stretches, and absorbs detergent. Use a clothing-specific label or an iron-on system that follows the maker's care instructions. A waterproof hard-surface sticker isn't a substitute for a laundry label.
Shoes: Shoes need readable identification in a place that doesn't experience constant bending or toe abrasion. Interior heel areas can work for some styles, while an exterior side panel may be easier for staff to inspect. Test the placement before labeling every pair.
Bags and gear: Backpacks, lunch bags, helmets, and sports equipment face rain, sunlight, and friction from straps. Place the label on a smooth panel when possible, and avoid seams, mesh, heavily textured fabric, or areas that fold repeatedly.
A bottle-labeling routine becomes easier when you combine a visible name with a consistent placement rule. Guidance on labeling bottles for daycare can help families decide where the name should go and how to prepare the surface before application.
The same logic works in a pantry or classroom supply area. Label containers where the name remains visible after items move, stack, and get wiped down. If you're using a video demonstration to compare placement ideas, watch it after identifying the surfaces in your own home.
How to Choose the Right Style and Size
A name label can be technically durable and still fail its practical purpose if nobody can read it. I've seen tiny names disappear on large bottles and oversized lettering crowd the only flat space on a small snack container. The best size is the one that remains legible at a glance without forcing the label around a curve or across a seam.
Start with the available surface
Measure the flat area before choosing a size. A broad lunchbox front can support a larger first name, while a slim bottle may need a compact rectangle or individual letters arranged within a narrow space. Leave enough room around the design for the adhesive to make full contact.
For daycare, prioritize quick recognition over elaborate wording. A first name may be enough when staff already have the child's records, while a first name and initial can help distinguish children with similar names. Avoid placing letters where a lid edge, handle, zipper, or strap will repeatedly catch them.
Make the type easy to identify
Rounded fonts can feel friendly for younger children, but decorative details shouldn't compromise letter recognition. Clear sans-serif styles often work well on small labels because their shapes remain distinct when viewed quickly. Letters such as “I,” “l,” and “1” deserve special attention if a child's name or initials include them.
Color can reinforce recognition. A child may learn that their items use a particular background and letter combination, while a teacher can spot that pattern across a crowded table. Strong contrast usually matters more than a trendy palette. Pale lettering on a pale background may look attractive online and become difficult to read after a few scratches or under dim classroom lighting.
Use custom label size guidance to compare the available space on each item before ordering. Ordering one universal size sounds convenient, but a mixed set often works better because bottles, shoes, bags, and lunch containers have different shapes.
Think about the child who uses it
A toddler may recognize a bold color and a simple name shape before reading every letter. An older child may prefer a more understated design that fits sports equipment or a school binder. Let the child participate in choosing the style, but keep the final decision grounded in visibility, surface fit, and care requirements.
Making the Smart Buying Decision
The strongest buying decision starts with the care routine, not the product color. List the items that need names, then separate hard surfaces from fabric and identify which objects enter a dishwasher, washing machine, outdoor environment, or microwave. That short inventory prevents the common mistake of buying one label type for every belonging.
Use this purchase checklist
- Construction: Look for a water-resistant face material, stable printing, and a pressure-sensitive adhesive suited to the intended surface.
- Care claims: Check whether the manufacturer specifically addresses hand-washing, dishwasher use, laundering, outdoor exposure, or heat. Don't convert one claim into another.
- Application instructions: A product should tell you how to clean the surface, apply the label, and allow the bond to develop before washing.
- Design flexibility: Multiple sizes, readable fonts, strong contrast, and simple customization make it easier to label objects without forcing one awkward format everywhere.
- Replacement planning: Children lose, outgrow, and damage items. A bundle that covers bottles, clothing, shoes, bags, and gear can simplify ordering, but only if each label type matches its intended material.
- Safety details: If a label may contact food or drink surfaces, look for separate information about food-contact suitability rather than relying on the word waterproof.
Premium pricing is justified by a construction and care specification that matches your routine. It isn't justified by decorative language alone. A beautiful name that peels from a lunchbox after washing costs more in frustration than a plain label that stays readable and attached.
Buying test: Before you order, finish this sentence for every item: “This label must survive…” Include the actual treatment, such as condensation, detergent, flexing, sunlight, or rubbing.
Apply labels to clean, dry surfaces and press down the edges carefully. Give the adhesive its recommended dwell time before exposing the item to water. If a corner lifts, remove the label rather than pressing a dirty, curled edge back into place. Dirt trapped underneath usually shortens the life of the replacement.
A reliable labeling system doesn't promise that every sticker survives every condition. It gives each bottle, lunchbox, shoe, jacket, and backpack a label designed for its own routine. That's the standard parents and daycare teams should use when comparing waterproof sticker letters.
InchBug offers customizable waterproof labels and personalized essentials for bottles, lunchboxes, clothing, shoes, bags, and sports gear, including options designed for dishwasher and laundry routines. Visit InchBug to choose readable name labels that match your child's everyday belongings and care needs.