

You've bought the bottles, chosen the school colors, and set aside a corner of the table for drinks. Then the cooler fills with condensation, the labels start curling at the edges, and the carefully arranged beverage station looks less polished than it did in your plan. The fix isn't just choosing a prettier template. Water bottle labels for graduation work best when their size, material, and adhesive match the exact bottles and serving conditions you'll use.
Why Personalized Graduation Bottle Labels Work So Well
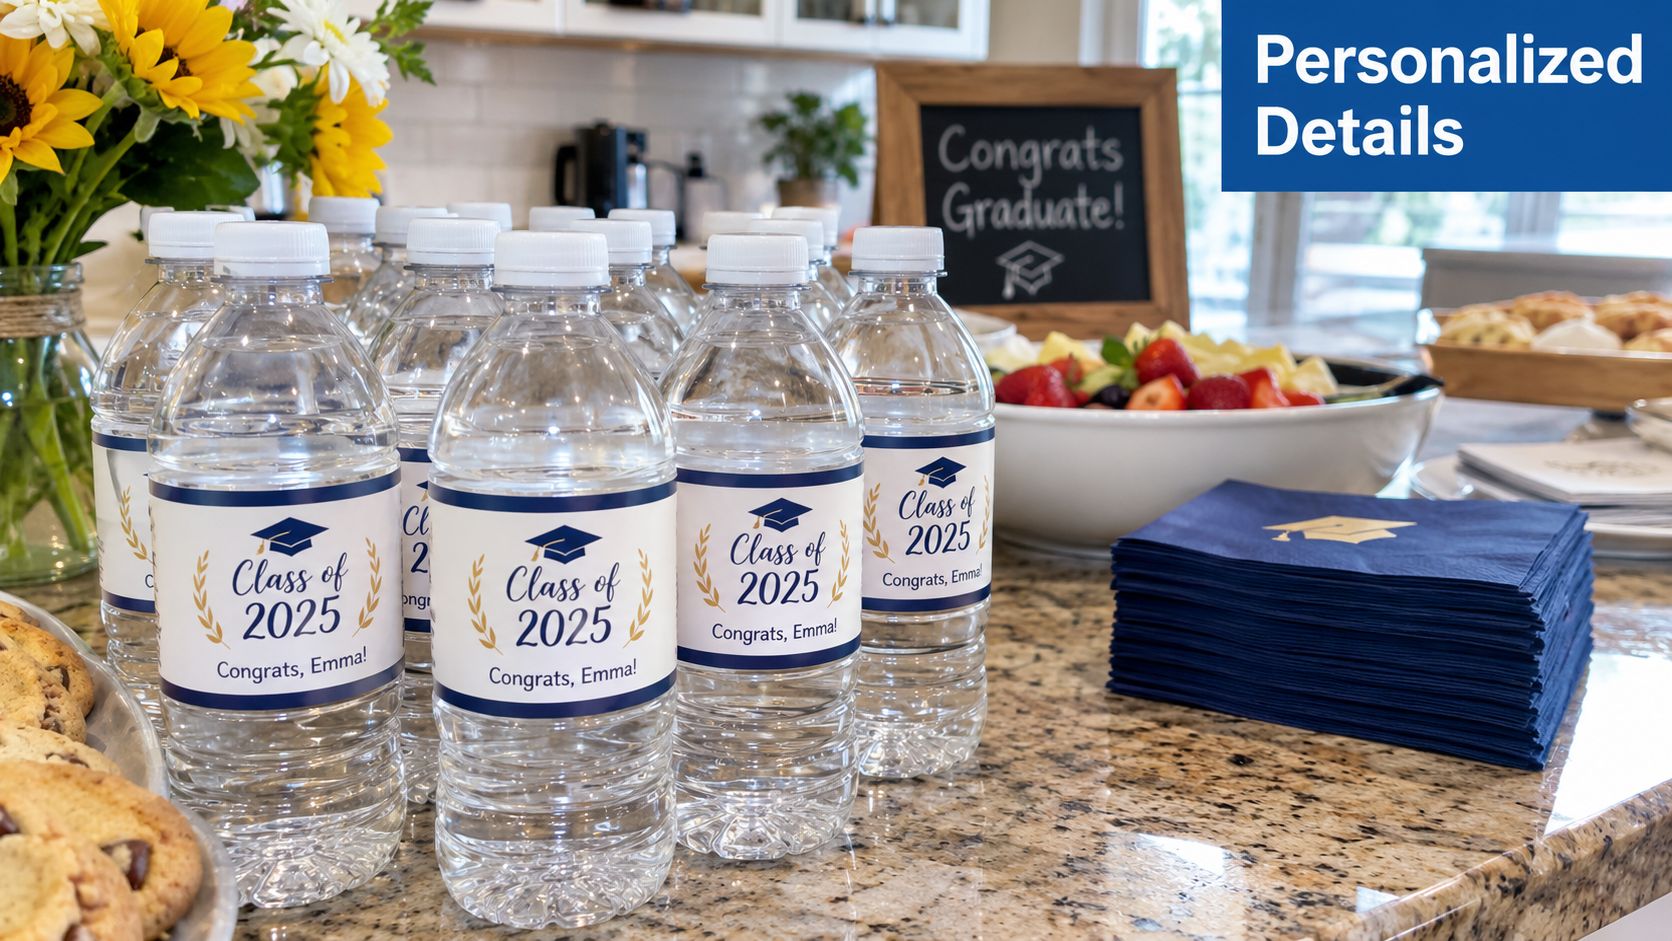
At an open house, guests arrive at different times, move between the yard and food table, and return to the cooler throughout the day. Water bottle labels for graduation give each bottle a clear identity, while matching designs make the drink station look planned rather than assembled from mixed packages.
A labeled bottle can also support the party's visual story. Place matching bottles near the cake, memory board, or gift table, and the graduate's name, school colors, or class message appears naturally in photos. A short message or name can make the bottle feel like a small favor guests may keep after the celebration.
When labels earn their place
Labels earn their place when drinks are visible, guests are taking photos, or the event uses an open-house format. They also bring consistency to coolers filled with different bottle brands and help guests recognize a self-serve drink station quickly.
They add less value when bottles stay in a refrigerator and are poured into cups immediately. A coordinated sign or small favor tag may create the same sense of occasion with less preparation.
Practical rule: Treat the label as part decoration, part guest guidance, and part favor. If it handles two of those jobs, the preparation usually pays off.
The category now includes more than one-off printable party extras. Published listings offer graduation labels in fixed quantities such as 24, 32, 50, 100, and 120, serving gatherings of different sizes. The same listings emphasize waterproof and easy-to-apply construction, which fits how bottles are handled, chilled, transported, and placed in busy coolers. A representative personalized graduation label listing shows how event-ready materials are now part of the category.
The main trade-off is preparation versus performance. A decorative label only helps if it stays readable and attached through the serving routine, so judge the design against the bottles and coolers you will use, not a generic product photo.
Choosing the Right Size and Material for Your Bottles
A generic template is only a starting point. Bottles with the same volume can have different shoulders, ridges, seams, and flat label channels, so a label that fits one retail bottle may wrinkle or overlap badly on another. A practical label-maker guide recommends measuring the exact bottle and testing with a paper strip rather than relying on a universal chart. Bottle Label Maker's measuring guidance explains why that small test prevents larger ordering mistakes.
Measure before designing
Use the bottles you'll serve, not an older bottle from the pantry.
- Wrap a paper strip around the intended label area. Mark where the strip meets itself, then measure the strip length. This gives you a useful width for a wrap label without guessing.
- Check the flat section between ridges. Measure from the top to the bottom of that smooth area. A label that extends into a ridge may lift, buckle, or look uneven.
- Test the seam. Wrap the paper around the bottle and decide whether you prefer a small overlap or a narrow gap. Keep faces, names, and important wording away from that seam.
- Repeat for mixed bottles. If you're using different brands or shapes, don't assume one label will suit all of them.
Common templates are built around retail bottle formats. One independent template source lists sizes for 8 oz to 16.9 oz bottles, while another graduation template is designed for 16 oz bottles with three labels per sheet. Commercial wrap listings also commonly use a 2 x 8 inch format, giving planners a practical benchmark, not a guarantee. OnlineLabels' water bottle template guidance provides examples of these standardized formats.
Match material to the cooler
Paper can work for a short indoor display where bottles stay dry. It's budget-friendly and easy to print at home, but condensation can soften the edges and cause ink to smear.
For ice buckets, outdoor tables, or bottles that will be handled repeatedly, choose a waterproof plastic film such as BOPP, PET, or vinyl with a permanent moisture-resistant adhesive. BOPP is commonly recommended for water bottles because it resists water and tearing while maintaining strong print quality. PET offers additional dimensional stability, while vinyl can help when the bottle surface is more curved. Blue Label Packaging's material comparison outlines these trade-offs.
Before committing to a full run, apply a sample to the actual bottle, chill it, rub the surface, and inspect the edges after exposure. If you're still gathering practical supplies, a guide to budget-friendly graduation supplies from Gradshop can help you coordinate the rest of the setup.
For families comparing reusable bottle identifiers with disposable wraps, waterproof labels for water bottles offers another way to think about durability and repeated use.
Design and Wording Ideas That Look Great in Photos
A bottle wrap has limited space, and a crowded design becomes even harder to read once it curves around the bottle. Start with one focal point, then add only the information guests need to see quickly.
A reliable layout places the graduate's name or main message in the visual center, the class year or school below it, and decorative elements around the edges. Keep the seam clear of faces, logos, and long words. Strong contrast matters more than elaborate decoration, especially when bottles sit several feet away on a busy table.
Build the message around the graduate
Short wording photographs better than a paragraph. Try a formula such as:
- Classic: “Congratulations, [Name]” with the school colors and class year.
- Milestone-focused: “[Name] | Class of [Year]” with a cap, diploma, or laurel motif.
- Personal: “The next chapter starts now” paired with the graduate's name.
- Photo-led: One portrait or childhood image, supported by a simple name and school line.
- Future-focused: “Next stop, [destination or goal]” when the party theme reflects what comes next.
Use a readable display font for the name and a clean sans serif for supporting text. Two type styles are usually enough. Script lettering can look lovely in a close-up photo, but it shouldn't carry essential information if guests need to read it quickly.
Choose a style that matches the table
Black, white, and gold create a formal look that works well with graduation caps, metallic accents, and dessert tables. A modern minimal design uses a white background, one school color, and generous empty space. A photo collage can feel personal, but use a single strong image if several small photos become muddy at wrap size. For younger graduates, bright shapes, stars, and playful icons add energy without requiring complicated wording.
A quick paper mockup will reveal problems that aren't obvious on a screen. Print the design, wrap it around a bottle, and photograph it beside the planned plates or centerpiece. For more inspiration on balancing color, type, and personalization, browse these label design ideas before finalizing the file.
DIY Printable or Custom Printed Labels
DIY labels make sense when you have a small indoor gathering, access to a reliable printer, and enough time to cut and apply each wrap. Custom printing becomes more practical when the bottles will sit in ice, the design includes photographs, or the event has enough moving parts that a reprint would create stress.
The comparison isn't just the price of paper versus a printed order. Home production also uses ink, adhesive sheets, cutting time, and attention during an already busy planning period. A professionally printed waterproof label may cost more per label, but it removes several failure points.
DIY vs Custom Printed Graduation Bottle Labels
| Factor | DIY Printable | Custom Printed |
|---|---|---|
| Best fit | Small indoor gatherings and simple designs | Coolers, outdoor parties, and photo-led designs |
| Material | Usually paper or printable sticker stock | Waterproof BOPP, PET, or vinyl options |
| Control | Easy to edit and print replacements | Proof the design before the full order |
| Labor | Requires printing, cutting, peeling, and applying | Arrives ready to apply |
| Moisture resistance | Depends heavily on the stock and ink | Usually stronger when specified for bottles |
| Finish | Can look personal and handmade | Consistent sizing and color across the batch |
| Risk | Smudging, uneven cuts, and last-minute printer issues | Shipping, proofing, and material selection need planning |
Make the choice by event conditions
Choose DIY when the bottles will remain dry and the label is mainly a decorative accent. A simple school-color band with a name can look polished without demanding specialty equipment. Before printing the whole batch, test one sheet and wrap a real bottle to check the seam, scale, and color.
Choose custom printed labels when a cooler will be packed with ice or bottles will move between refrigeration, transport, and the serving table. Waterproof construction matters more than a glossy finish in that environment. The label templates for printing resource can help families who want to start with a printable layout and compare it with a professionally produced version.
Durability can also support reuse. A sturdy label or reusable identifier may be worth selecting when bottles will serve as keepsakes, classroom containers, or gift bottles after the event. For design inspiration beyond bottle wraps, explore these creative graduation cap designs and carry a favorite motif onto the drink table.
Ordering Quantities Timelines and Flawless Application
Quantity planning should follow the actual serving setup. Count the bottles guests will receive, then add a practical buffer for spills, damaged wraps, and late-arriving guests. A small family gathering may need only a modest reserve, while a larger celebration benefits from enough extras to keep the display consistent if several labels fail.
Order early enough to review the proof, receive the package, and test the material on the exact bottle you will use. Graduation season can compress vendor schedules, leaving little time to correct a wrong size, color, or finish. Keep some bottles unlabelled until setup if they will remain in storage, and reserve a few extras for the photo display or last-minute replacements.
A calm production schedule
When the package arrives, check the count, print quality, cut edges, and adhesive. Apply one sample to a room-temperature bottle, then expose it to the same refrigerator, cooler, ice, and handling conditions expected on the event day. A label that looks fine indoors may lift or scuff once condensation and repeated handling enter the picture.
Apply wraps without fighting condensation
- Clean the bottle. Remove dust, oils, and residue from the label area with a clean, dry cloth.
- Let the surface dry completely. Cold bottles can develop condensation before you notice it, so apply labels before chilling whenever possible.
- Align the center first. Tack the middle of the label to the bottle, then smooth one side and the other. This gives better control than starting at one edge.
- Press the seam and edges. Work from the center outward to reduce trapped air, then apply firm pressure at the join.
- Allow adhesive cure time. Keep freshly labeled bottles out of melting ice until the adhesive has settled.
The water bottle label application guide offers a visual reference for applying wraps. Watch for edge lifting on curved surfaces, print wear from friction, and distortion when labels meet cold, wet bottles. Guidance from The Packaging World explains that the substrate, adhesive, laminate, and bottle surface work together. A waterproof face alone does not guarantee a durable result.
Final Tips for a Smooth Graduation Celebration
The polished look comes from a short chain of practical decisions. Measure the actual bottle, keep the important wording away from the seam, select paper for dry indoor use or waterproof film for coolers and outdoor service, and test one finished label before applying the full batch.
Store labeled bottles upright in a cool, dry place. If the bottles need to be chilled, leave enough time for the adhesive to settle first. Keep spare labels and a few extra bottles near the serving station, but away from melting ice until they're needed.
A quick event-day check
- Fit: The wrap sits on the smooth label area without crossing ridges.
- Readability: The graduate's name and class message are visible from the table.
- Condition: Edges lie flat, and the print doesn't smear when handled.
- Placement: Bottles face the same direction for cleaner photos.
- Reuse: Save a few durable labeled bottles or identifiers as keepsakes rather than discarding every decorative piece.
- Backup: Extra labels, dry cloths, and room-temperature bottles are ready nearby.
Sustainability deserves a place in the decision. Trend coverage for graduation celebrations highlights personalized displays such as “Then and Now” photo installations, while durable water-resistant formats can remain useful after the party instead of serving only as disposable decoration. These graduation party planning tips can help coordinate labels with the wider setup, while party labels and favors offers ideas for carrying the same personalization into treat bags and other guest details.
The best labels don't demand attention on party day. They sit straight, survive the cooler, look intentional in photos, and let you focus on celebrating the graduate.
For graduation bottles that need a reusable, personalized option, InchBug offers Orbit Labels, silicone bottle bands designed for standard-sized water bottles, along with waterproof name labels for everyday drink containers. Visit InchBug to choose a practical label style that can keep working after the celebration ends.