

By the time school forms are signed, lunch gear is washed, and the extra set of clothes is packed, most families hit the same point: too much stuff, too many similar water bottles, and not enough time to keep replacing what comes home in someone else's backpack. The missing lid, the mystery sweatshirt, the cup that looks exactly like every other cup in the daycare fridge. That's the daily problem a label maker is supposed to fix.
The brother p-touch d200 is one of those gadgets parents keep circling back to because it feels manageable. It isn't a complicated office machine. It's a small label maker you can keep in a kitchen drawer, pull out during back-to-school season, and use without opening a laptop. If your goal is to calm down the toy shelf, the snack bins, and the pile of charging cords, it makes a lot of sense.
Where things get more complicated is kids' gear. A label that works beautifully on a storage bin may not hold up the same way on a bottle that gets washed constantly, or on clothing that gets tossed in the laundry. That's the part many product reviews skip, even though it's the part parents care about most.
Taming the Chaos of Kids Stuff with a Label Maker
A lot of family mess isn't really mess. It's just volume. Tiny socks, daycare sheets, sunscreen sticks, bibs, extra underwear, art smocks, headphones, library bags. The problem isn't that parents don't organize. It's that kids move fast, caregivers rotate, and belongings travel from house to car to classroom and back again.
The first time a label maker earns its keep is usually with the easy wins. Toy bins get named. Snack containers get sorted. A basket marked “return to school” suddenly keeps papers from taking over the counter. If you're trying to get one room under control, these kids room organization ideas for less clutter pair well with a simple label system because they turn broad cleanup goals into visible homes for everyday items.
Where parents usually start
Most families don't buy a label maker because they love office supplies. They buy one after repeating the same annoyance too many times.
- Shared items keep getting mixed up: Cups, glue sticks, chargers, and jacket hooks all start to blur together.
- Kids can't put things back: A clear label on a bin gives even younger kids a visual cue about where things belong.
- Routine tasks get repetitive: The same names and categories come up again and again.
Practical rule: Label the things that cause arguments, delays, or replacement costs first.
That's why the brother p-touch d200 stays relevant for families. It fits the kind of labeling most parents do at home. Short text. Quick jobs. Repeats. A name on a pencil case. A category on a basket. A reminder label near the entryway.
The real question
For home organization, almost any decent label maker can help. For kid gear, the question changes. Parents don't just want neat labels. They want labels that still look readable after the lunchbox leaks, the bottle gets washed, or the hoodie spends a full day on the playground floor.
That's where this device is useful, but not universal.
What Exactly Is the Brother P-Touch D200
The simplest way to think about the brother p-touch d200 is this: it's a small keyboard that prints labels on laminated tape. That's why it feels approachable even if you're not a tech person. You type directly on the device, choose a basic style, and print right away.
Brother's retail listing shows the PT-D200 has been around since 2012 and prints on laminated TZe tape up to 1/2 inch (12 mm) wide, with support for 1 or 2 lines of text and memory for up to 30 favorite labels on the device on Office Depot's product page. That long product life says something useful for parents. It's not a trendy gadget that appeared and disappeared. It's a steady, familiar option for basic home labeling.
What makes it parent-friendly
You don't need software to use it for most household tasks. The built-in keyboard is the point. If you can text on a physical keyboard, you can use this machine.
A few details matter more in family life than they do in generic product reviews:
- QWERTY keyboard: Easier for quick names and short words than scrolling through letters.
- Compact size: Small enough to keep nearby instead of storing it in a closet.
- Saved labels: Helpful when you're printing the same child's name over and over.
- Two-line printing: Useful for names plus a phone number, class name, or allergy note on larger labels.
If you want a broader walkthrough of common features and tape options, this guide to using a Brother P-touch label maker is a useful companion.
Choosing the right P-Touch TZe tape
Not every labeling job needs the same tape. The device may be the same, but the success of the label often depends on where you stick it.
| Tape Type | Best For | Parent Tip |
|---|---|---|
| Standard laminated TZe tape | Toy bins, pantry containers, school supply caddies, file folders | Use this for dry, smooth surfaces where you want clean, readable labels fast. |
| Extra-strength adhesive TZe tape | Frequently handled bins, gear boxes, rougher plastic surfaces | Better when little hands keep tugging at corners or the surface isn't perfectly slick. |
| Iron-on tape | Clothing and fabric items that need an applied fabric label solution | Good for some fabric use cases, but always test on one item first and follow tape instructions carefully. |
| Decorative or colored TZe tape | Kids' drawers, chore charts, reward bins, craft storage | Color coding helps non-readers and early readers find the right spot faster. |
Laminated tape is great for a lot of household organization. It isn't automatically the right answer for every washable kid item.
That distinction matters more than the feature list.
Your First Label A Simple Step-by-Step Guide
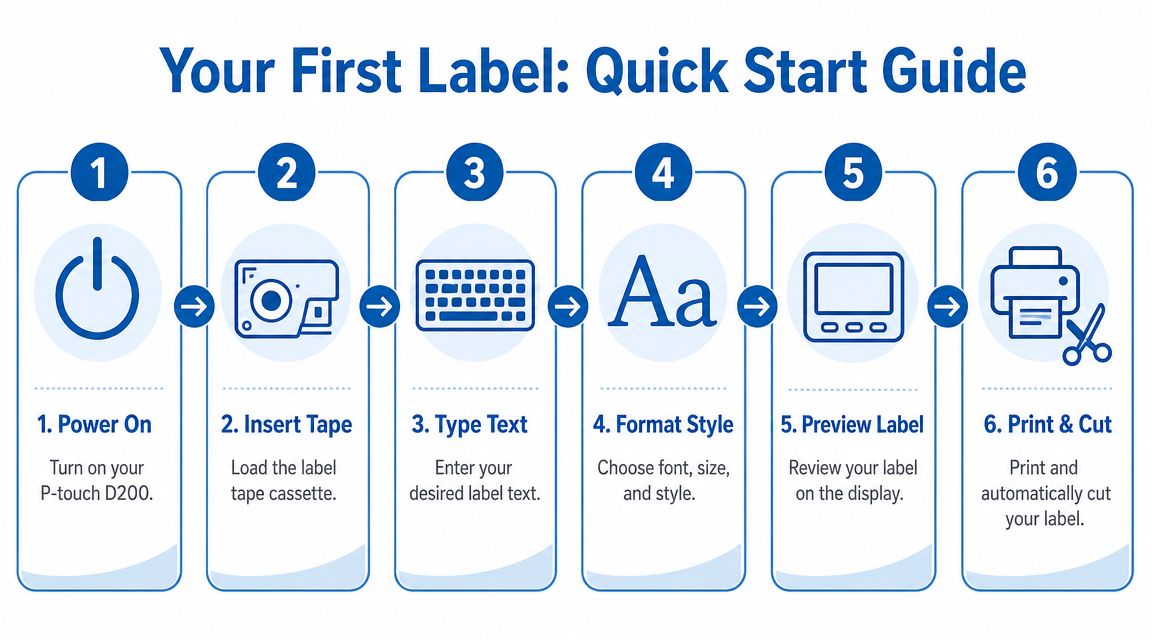
The first setup is easier than most parents expect. Once the tape is loaded and the machine is powered, the brother p-touch d200 feels very straightforward. That's one reason it works well for quick labeling sessions at the kitchen table.
Get it ready before you type
Start with the basics. Install the batteries, open the compartment for the tape cassette, and make sure the tape sits correctly before turning the machine on. A rushed setup is the fastest way to waste tape.
Then power it up and look at the display. Brother's specifications list a 15-character x 1-line LCD, plus storage for up to 2,400 characters across 30 memory areas, which is what makes repeated reprints practical for names, cubbies, and supply labels in Brother's PT-D200 specifications.
Type a simple first label
Keep the first one boring. A child's name, “snacks,” or “markers” is enough. Short labels help you get comfortable with spacing and sizing before you try anything fancier.
A basic flow works well:
- Choose one item first. Don't start with the entire playroom.
- Type the text as you want it to appear. Double-check spelling before printing.
- Use formatting lightly. Bigger text is usually more useful than decorative styling.
- Preview on the screen. Make sure the label suits the object, especially if space is tight.
- Print and cut. Apply it to a clean, dry surface.
If you want to see the device in action before trying it, this quick video helps:
Save the labels you know you'll reuse
The memory feature is where this model becomes more than a one-off gadget. If you repeatedly print the same name, room label, or class identifier, save it. That way you aren't retyping during every supply refresh.
Examples worth saving:
- A child's full name
- Last name for shared family items
- “Change of clothes”
- “Art supplies”
- “Return to school”
There's also value in keeping the text plain. Cute symbols and frames can be fun on chore bins or toy baskets, but for daycare gear, readability matters more than decoration.
For families who eventually want to understand the broader Brother ecosystem, this overview of Brother P-touch Editor gives context, even though the D200 itself is primarily about on-device use.
Save the labels that create friction when you have to type them again. Names, allergy notes, and repeated classroom categories belong in memory first.
Practical Labeling Ideas for Your Home and School Gear
The best label maker systems don't begin with perfection. They begin with the things everyone touches every day. When labels match routines, kids use them.
At home
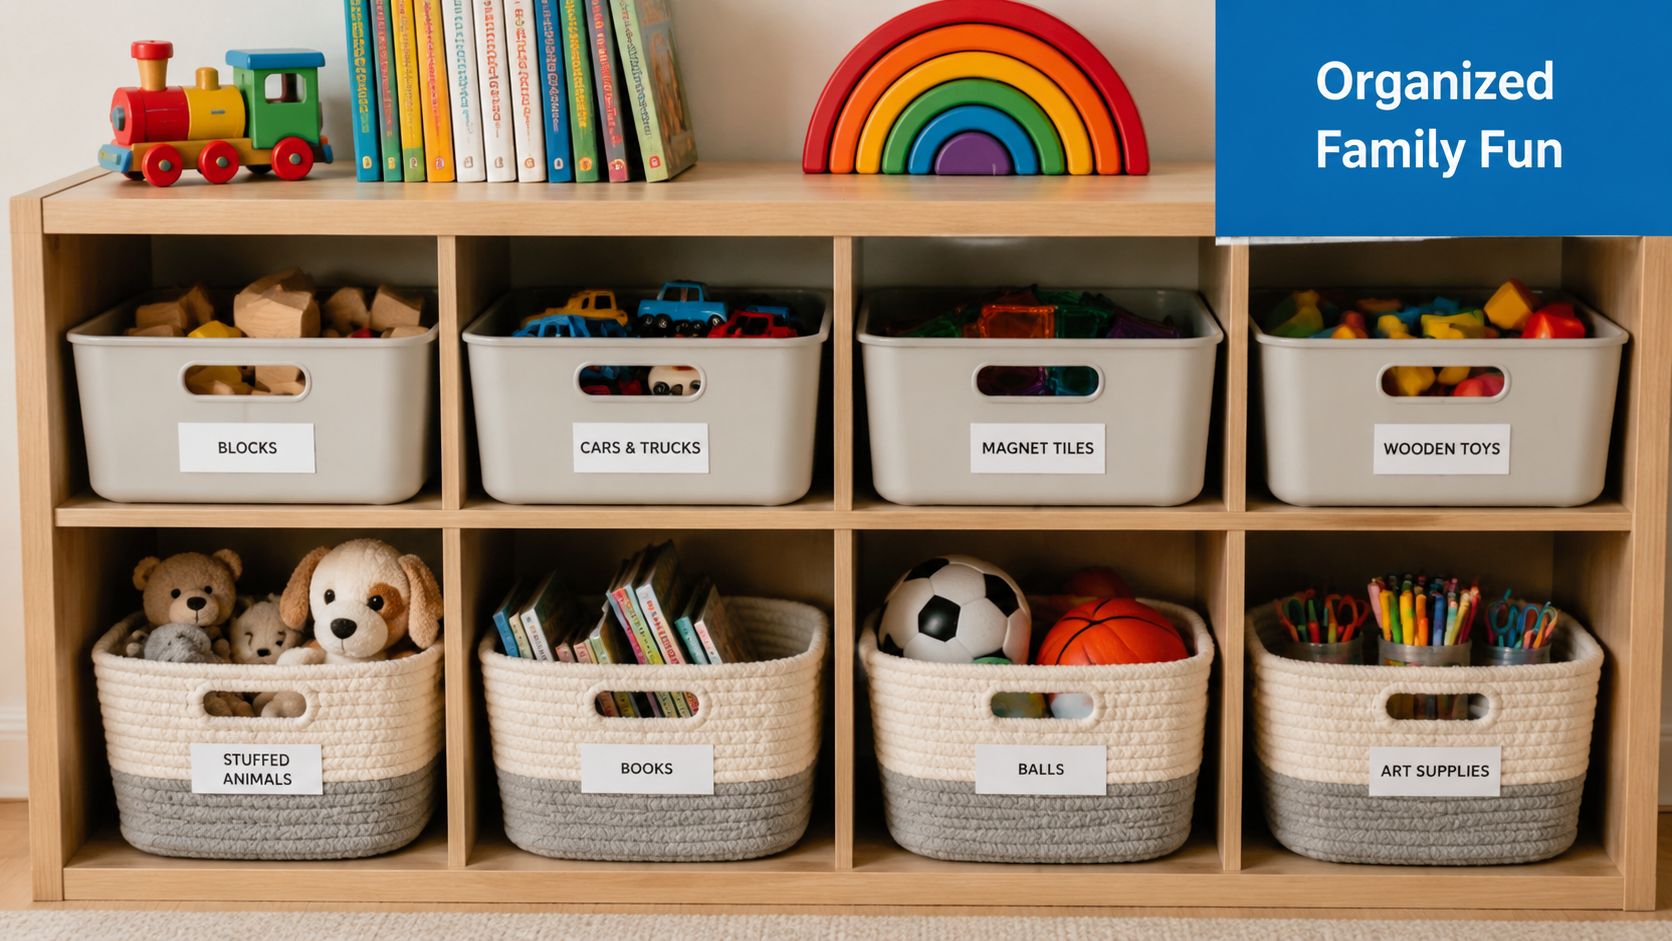
Toy storage is the obvious place to start, but it works because it changes behavior. A bin labeled “cars” is easier for a child to use than a parent's verbal reminder to “put that away where it belongs.” The same goes for art shelves, puzzle drawers, and entryway baskets.
A few family-friendly uses stand out:
- Toy rotation bins: Label what's inside so swaps are quick and visible.
- Pantry and lunch prep zones: Mark snack bins, sandwich tools, and reusable container lids.
- Cord control: Add labels to chargers, white-noise machines, and tablet cables so siblings stop claiming the same one.
- Leftover containers: Dates and contents reduce the mystery-container problem in the fridge.
For school and daycare support
Labels also help adults besides you. Teachers, daycare staff, grandparents, and babysitters all benefit when systems are clear.
Useful categories include:
| Item | Why a label helps |
|---|---|
| Cubbies and hooks | Makes drop-off and pickup less chaotic |
| Crayon and marker bins | Helps supplies return to the right child or station |
| Homework folders | Keeps take-home papers from blending together |
| First-aid or medication storage | Reduces mix-ups in shared family spaces |
If you're working on broader household systems, these storage labeling ideas for organizing family spaces can help you think beyond names and into routines.
Labels that teach, not just sort
One underrated benefit is that labels support independence. Children learn where things go, what belongs to them, and how to reset a space after using it. That matters just as much as the neat look.
A good family label doesn't just identify an item. It removes one small decision from an already busy day.
That's why many parents keep using the brother p-touch d200 after the first back-to-school rush is over.
A Parent's Review The Pros Cons and Hidden Costs
The brother p-touch d200 succeeds when you treat it like a quick-response home organizer. It's not trying to be a full design studio. It's trying to let you print a clean label now, not after opening software and troubleshooting settings.
What works well
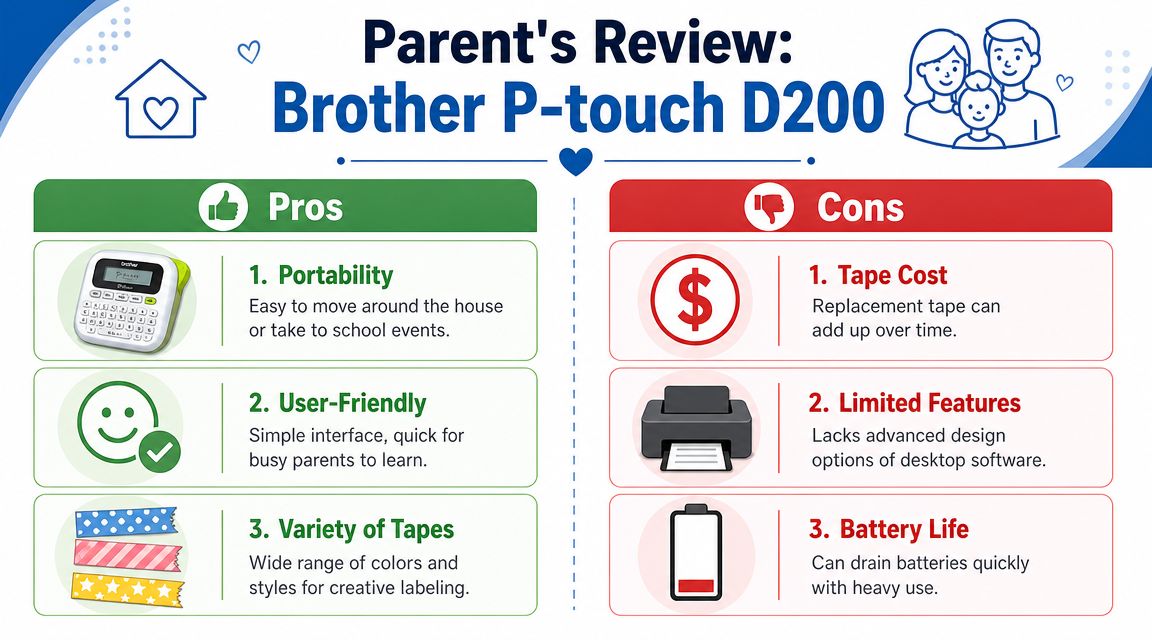
For many households, the strongest advantage is convenience. You can pick it up, type, print, and move on. That matters because family organization tools only help if people use them.
The practical upsides are easy to recognize:
- Portable enough for real life: You can carry it from the mudroom to the kitchen to the homework area.
- Low learning curve: Most parents won't need a manual after a few labels.
- Good for repeated categories: Pantry labels, toy bins, school drawers, and command-center folders are its comfort zone.
- Creative enough for family use: Different tape colors and simple formatting give you some flexibility without slowing you down.
Where the trade-offs show up
The hidden cost isn't the machine alone. It's the ongoing supplies. A parent doing occasional pantry labels may barely notice. A teacher labeling classroom materials or a family doing a full back-to-school round absolutely will.
A teacher review notes that the machine may be affordable upfront, but the real ownership cost includes TZe tape cartridges and the six AAA batteries required for operation, which can add up with heavier use in this PT-D200 review for classroom use.
That changes the value calculation.
| Situation | How the D200 feels in practice |
|---|---|
| Occasional home organization | Sensible and handy |
| Seasonal school-prep labeling | Helpful, but tape use climbs fast |
| Ongoing classroom or daycare labeling | Convenient, though consumables become a real planning item |
My honest take on value
If you want something for bins, drawers, food containers, and household categories, this device makes sense. If you expect one machine to cover every school, daycare, laundry, and bottle-labeling need, you may end up frustrated.
That doesn't mean the D200 falls short. It means parents need to buy it for the job it does well. Dry surfaces, repeated names, on-demand labels, simple systems. That's its lane.
DIY Labels vs Specialized Labels When to Choose InchBug
This is the part most reviews skip. They explain buttons and fonts, then stop before the question parents ask: Will the label still be there after real kid use?
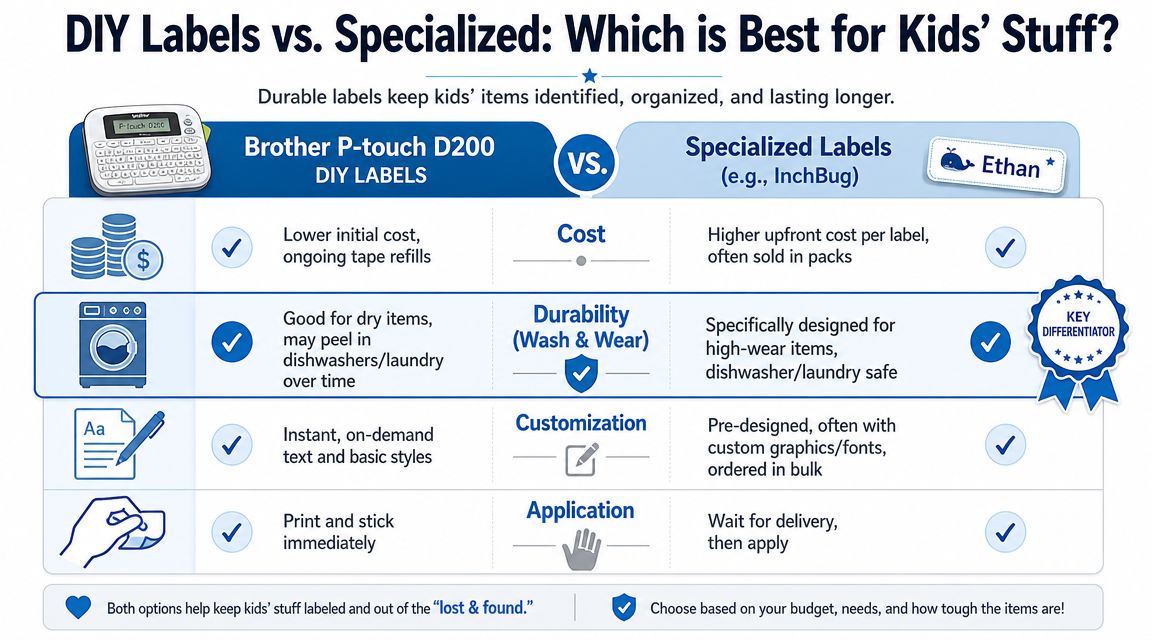
Brother's support materials focus on formatting features, while the broader conversation around this model often leaves a gap around harsh-use durability. That's a real issue for parents who need labels that can hold up in dishwashers, washing machines, or microwaves, and for anyone who specifically needs waterproof and fade-resistant labeling for daycare and school as reflected in Brother's support FAQ context.
When DIY labels are enough
The brother p-touch d200 is a good DIY choice when the item stays mostly dry, mostly indoors, and doesn't get flexed or scrubbed constantly.
That usually includes:
- Toy bins and shelves
- Pantry containers
- School supply drawers
- Folders and paper systems
- Charging cords and tech accessories
- Household storage baskets
These are low-drama surfaces. The label mostly sits there and does its job.
When a specialized label makes more sense
Kid gear is different. Bottles get washed. Lunch containers get heated. Shoes bend. Clothes stretch and go through the laundry. Labels on these items don't just need adhesion. They need staying power through repeated wear.
That's where a specialized product can be the better fit. InchBug offers kid-focused labels and identifiers built for common daycare and school stress points, including waterproof, fade-resistant options, plus clothing and shoe identifiers designed for washing and daily wear. If you're trying to sort through Brother tape options for family use, this guide to Brother P-touch label tape for school and home is a practical place to compare use cases.
A simple way to decide:
| Item type | Better fit |
|---|---|
| Toy bins, drawers, file folders | Brother P-touch D200 |
| Water bottles and lunch gear used hard every day | Specialized kid label |
| Clothing and shoes | Specialized identifier |
| Quick one-off labels needed immediately | Brother P-touch D200 |
Use the D200 where speed and flexibility matter. Use a specialized label where washing, heat, friction, or fabric are the real challenge.
That's the honest split. A DIY label maker is useful. A specialized label is often the safer call for the items most likely to disappear, peel, or come home unreadable.
If your family needs a mix of fast home organization and tougher labels for daycare or school gear, take a look at InchBug. It's a practical option for bottles, clothing, shoes, and other kid items that need labeling built for daily wear.